Product successfully added to your shopping cart
Salted Eggs
The Art of Homemade Salted Eggs: A Complete Guide to Crafting This Savory Staple
Salted eggs, with their glistening, golden-orange yolks and intensely savory flavor, are a cornerstone of many Asian cuisines. From being the star in rich sauces coating crispy prawns to the treasured center of mooncakes, their unique taste is irreplaceable. While readily available in stores, making your own at home is a simple, satisfying, and cost-effective process that yields far superior results. This complete guide will walk you through everything you need to know to master the art of homemade salted eggs.
Why Make Your Own?
-
Quality Control: You choose the freshest, highest-quality eggs.
-
No Additives: Commercial versions may contain preservatives; yours will be pure.
-
Customizable: Adjust salinity and experiment with flavors (e.g., adding tea, spices).
-
Deeply Rewarding: There’s a unique pride in transforming a basic ingredient through time-honored preservation.
Understanding the Science
The process is one of osmosis and diffusion. A hyper-salty environment (the brine) draws water out from the egg white and yolk through the semi-permeable shell. Simultaneously, salt ions slowly migrate inward. This dehydrates the egg, firms the proteins, and cures the yolk to that iconic firm, granular, and oily texture.
Method 1: The Classic Brine (Most Reliable)
This water-based method is the gold standard for consistency and is perfect for beginners.
Ingredients & Equipment
-
Eggs: 10-12 fresh duck eggs (traditional, for larger, richer yolks) or large chicken eggs. Crucially, they must be uncracked and fresh.
-
Salt: 2 cups (approx. 500g) coarse sea salt, pickling salt, or non-iodized rock salt. Iodized salt can cause cloudiness and off-flavors.
-
Water: 8-10 cups (2-2.5 liters) filtered or distilled water.
-
Container: A large, clean, sterilized glass jar, ceramic crock, or food-grade plastic container with a tight-sealing lid.
-
Weights: A small sterilized plate or a sealed zip-top bag filled with water to keep eggs submerged.
-
Optional Flavorings: 3-4 star anise, 1 tablespoon Sichuan peppercorns, 2-3 bay leaves, or a strip of dried orange peel.
Step-by-Step Instructions
1. Preparation & Sterilization
-
Clean the Eggs: Gently wash eggs in cool water to remove debris. Inspect for hairline cracks.
-
Dry & Treat: Pat eggs completely dry with a clean towel. For an extra layer of sterilization and to help brine penetration, you can wipe each egg with vinegar or rice wine. Let them air-dry fully to room temperature. Any moisture on the shell can dilute the brine spot.
-
Sterilize the Jar: Wash your container in hot, soapy water and rinse thoroughly. For best results, sterilize by pouring boiling water into it, or running it through a dishwasher.
2. Creating the Brine
-
In a large pot, bring the water to a rolling boil.
-
Add the salt (and any desired spices) and stir until completely dissolved. Continue adding salt until no more will dissolve and crystals settle at the bottom—this is a saturated brine, which is essential for proper curing.
-
Remove from heat and let the brine cool completely to room temperature. Never pour hot brine over eggs, as it will cook them.
3. The Brining Process
-
Carefully place the dried eggs into your prepared jar.
-
Pour the cooled brine over the eggs, ensuring they are fully submerged.
-
Place your weight (plate or water bag) on top to prevent any eggs from floating above the brine line.
-
Seal the container tightly.
4. The Waiting Game: Curing & Storage
-
Label your jar with the start date.
-
Store it in a cool, dark place (like a pantry or cupboard). Do not refrigerate during curing, as the cold temperature will drastically slow down the salt penetration.
-
Curing Timeline:
-
15-18 Days: Yolks will be slightly salted, darker in color, and retain a denser, custard-like texture. Whites are salty but still liquid when raw. Ideal for steaming with minced pork.
-
30-40 Days (Traditional): Yolks will be fully cured—firm, bright orange-yellow, granular, and oily. Whites are very salty and firm when cooked. Perfect for hard-boiling, baking, or making salted egg yolk sauce.
-
5. Testing & Halting the Cure
-
After your target minimum date, remove one egg. Rinse it, boil it for 15-20 minutes, and taste it.
-
If it’s to your liking, the curing process must be stopped. Remove all eggs from the brine, rinse them under water, and pat them completely dry.
-
Storage: Transfer the finished salted eggs to the refrigerator, where they will keep for 3-4 weeks. For short-term use (1-2 weeks), they can be stored at room temperature.
Method 2: The Salt Pack (Dry Cure)
This method is faster for curing yolks and uses no water, resulting in less waste of the salty whites if you only desire the yolks for recipes.
Process:
-
Ensure eggs are cleaned, vinegar-wiped, and thoroughly dried.
-
In a container, create a 2-inch bed of coarse salt. Bury each egg completely in the salt, ensuring no egg touches another. Alternatively, make a thick paste of salt with a few drops of water or soy sauce, coat each egg thickly, and wrap them individually in plastic wrap.
-
Place the buried or wrapped eggs in a sealed container.
-
Store in a cool, dark place for 2-3 weeks. The lack of water means salt penetrates differently, often concentrating flavor in the yolk more quickly.
Pro Tips for Guaranteed Success
-
Egg Freshness is Paramount: Use the freshest eggs possible. Older eggs have larger air cells, which can lead to uneven curing.
-
The Drier, The Better: Any residual water on the eggshell promotes microbial growth and can create weak spots in the cure.
-
Ambient Temperature Matters: Ideal curing temperature is between 50-77°F (10-25°C). Warmer temperatures speed up the process but increase risk of spoilage; cooler temps slow it down.
-
Patience is a Virtue: Rushing the process leads to a salty white and an undercured, runny yolk. True yolk transformation happens in the later weeks.
Troubleshooting Common Issues
| Problem | Likely Cause | Solution/Prevention |
|---|---|---|
| Cloudy Brine | Minerals in salt or proteins leaching from eggs. | Normal and harmless. Use filtered water and pure salt. |
| Floating Eggs | Natural air cell in the egg. | Use a weight to submerge them fully. |
| Mold or Bad Odor | Contaminated eggs, jar, or eggs not submerged. | Discard batch. Ensure sterility and full submersion. |
| Weak, Runny Yolk | Curing time too short, brine not saturated, or too cold. | Cure longer, ensure brine is saturated, store in warmer spot. |
| Extremely Salty White | Inevitable with full cure. | Use the salty whites sparingly in fried rice, soups, or doughs instead of adding salt. |
Culinary Applications: Enjoy Your Creation
Your homemade salted eggs are now a versatile ingredient:
-
Hard-Boiled: The classic. Serve with plain congee or rice.
-
Salted Egg Yolk Sauce: The crown jewel. Mash cooked yolks, sauté with butter, curry leaves, chili, and cream for a luxurious sauce for seafood, tofu, or pasta.
-
For Baking: Use the cured yolks (baked or steamed first) in mooncakes, pastries, or cookies.
-
Steamed: Lightly cured eggs are stunning steamed with minced pork or tofu.
-
In Salads: Thinly sliced or chopped as a potent garnish.
Conclusion
Making salted eggs at home connects you to a timeless food preservation technique. It requires minimal hands-on effort—just cleanliness, patience, and a little space in a cupboard. The reward is a pantry stocked with a powerfully flavorful ingredient, crafted by your own hands, ready to elevate countless dishes. So, gather your eggs and salt, and embark on this simple, delicious kitchen project.

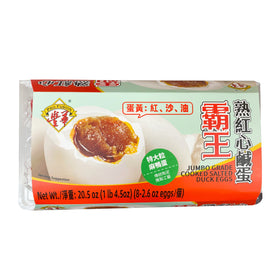
净重:330g 原产地:中国在清朝时期,淀边就有很多作坊,加工松花蛋、青果(咸鸭蛋),通过水陆运输,运往京、津、保一带,在市场上备受青睐。有些产品还出口海外。其中红心咸蛋更是久负盛名,它咸淡可口,清香四溢,是夏日补钙之上品 The Salty Secret Weapon: Your Ultimate Guide to Using Salted Eggs Move over, ordinary eggs! Salted eggs, a staple in many Asian cuisines...
The Salty Secret Weapon: Your Ultimate Guide to Using Salted Eggs Move over, ordinary eggs! Salted eggs, a staple in many Asian cuisines (particularly Chinese,...